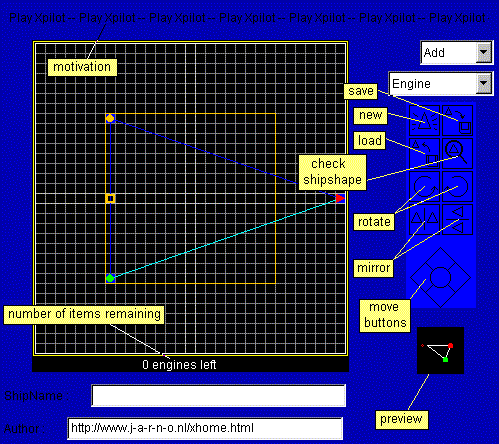

In the tool-menu you can choose to "Add", "Remove" or "Move" the selected
item from the item-menu. The tool, "Insert", can only be applied to "Hull".
When "Add" is selected and you click on the black grid, the selected
item will be added. In case of "Hull", "Left light" or "Right Light", the
preview will be updated.
When "Remove" is selected and you click on a selected item on
the black grid, the clicked item will disapear.
When "Move" is selected, you can drag the item, which is selected in
the item-menu.
When "Insert" is selected, you can click on a "Hull"-point, which will
then have a red circle surrounding it. The two neighbours of that point
will have a darker red circle around them. Click on one of these points,
and a "Hull"-point will be added between the two clicked points.
Below the two menu's there is an array of buttons, which are explained in the figure above. Only two buttons need further explaining :
"Save" when you click on this button, a dialog will appear. In this
dialog there is a small text, which you must copy into a text-file, or
directly in your .xpilotrc (Unix) or at the top of your XPilot.shp
(Windows). Then you can click on "Ok" and you are back
in the editor.
For more info about shipshapes, you should read the newbieguide
"Load" works about the same way. Again a dialog will appear in which you must paste a shipshape, which you have copied from a textfile, or you .xpilotrc. Then click "Ok" and this shipshape will be loaded into the editor, and you can improve it. Click on "Cancel" to keep the current shipshape.
The move buttons below this array of buttons can be used to move the shipshape about. They are like the arrow keys on your keyboard.
In the small preview-screen you can see your shipshape-to-be rotating. The small red dot circling about, means this is the front of your shipshape. If you click once on the preview it will stop rotating and thus lowering CPU-usage. Click again and it will start spinning again.
If I forgot to mention anything here, mail
me.